Purpose: Guide advertisers who are currently using the legacy Nextdoor pixel and need to migrate to the Universal Pixel framework
Pixel Implementation For Existing Advertisers
Who is this guide for?
This applies to advertisers who have or are currently advertising on Nextdoor and have implemented a Nextdoor pixel in the past. These advertisers are considered to be using the legacy pixel and will need to migrate to the Universal Pixel framework and standards, by doing EITHER the Full Migration or Partial Migration paths below. The following will guide you through the migration process for both.
Why Migrate?
There are many benefits to migrating to the universal pixel framework, as detailed here
Migration Options
- Full Migration (updating to the Universal Pixel)
- Direct / Manual
- Tag Management System
- Google Tag Manager
- Tealium
- Partial Migration (remapping legacy events)
For questions, advertisers should contact their Account Manager (AM).
Nextdoor AMs should collaborate with Solutions Engineers (SolEngs) to resolve any migration issues.
Full Migration
tl;dr: Changing the Legacy Pixel to the Universal Pixel in your website's code
-
For advertisers who implemented the Nextdoor pixel via a direct / manual implementation (custom coded; not in a tag management system)Direct / Manual- Locate your existing Nextdoor base pixel code.
- Find where you manually placed the existing Nextdoor base pixel code within your website's HTML. This is typically in the
<head>section of your site's pages.
- Find where you manually placed the existing Nextdoor base pixel code within your website's HTML. This is typically in the
- Update the base code.
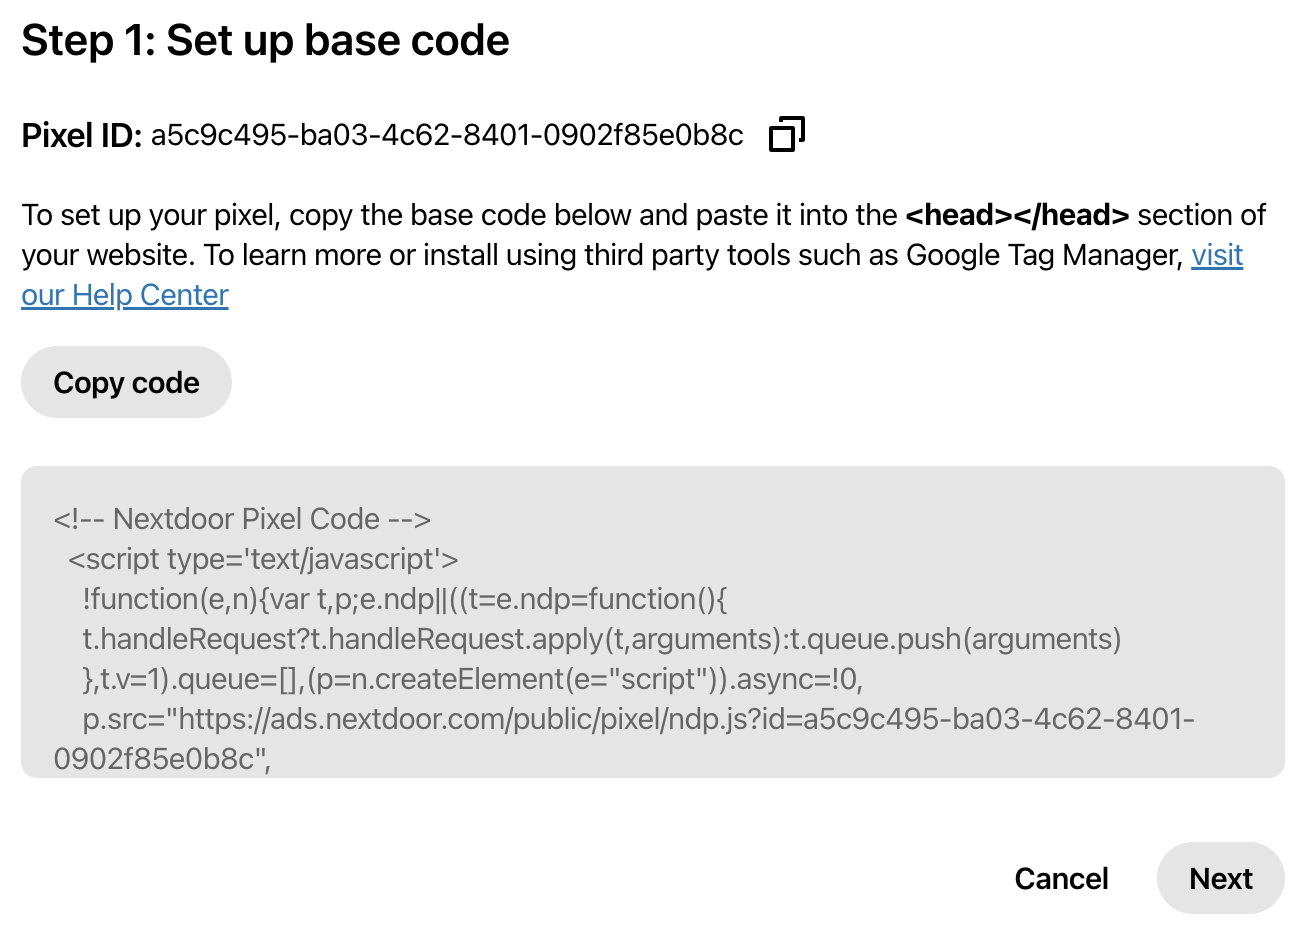
- Visit Nextdoor Ads Manager (NAM) > Assets > Pixels > Install Code, to view pixel installation steps.
-
- In “Step 1: Set up base code”, copy the code snippet. Click “Next” to go to Step 2.
-
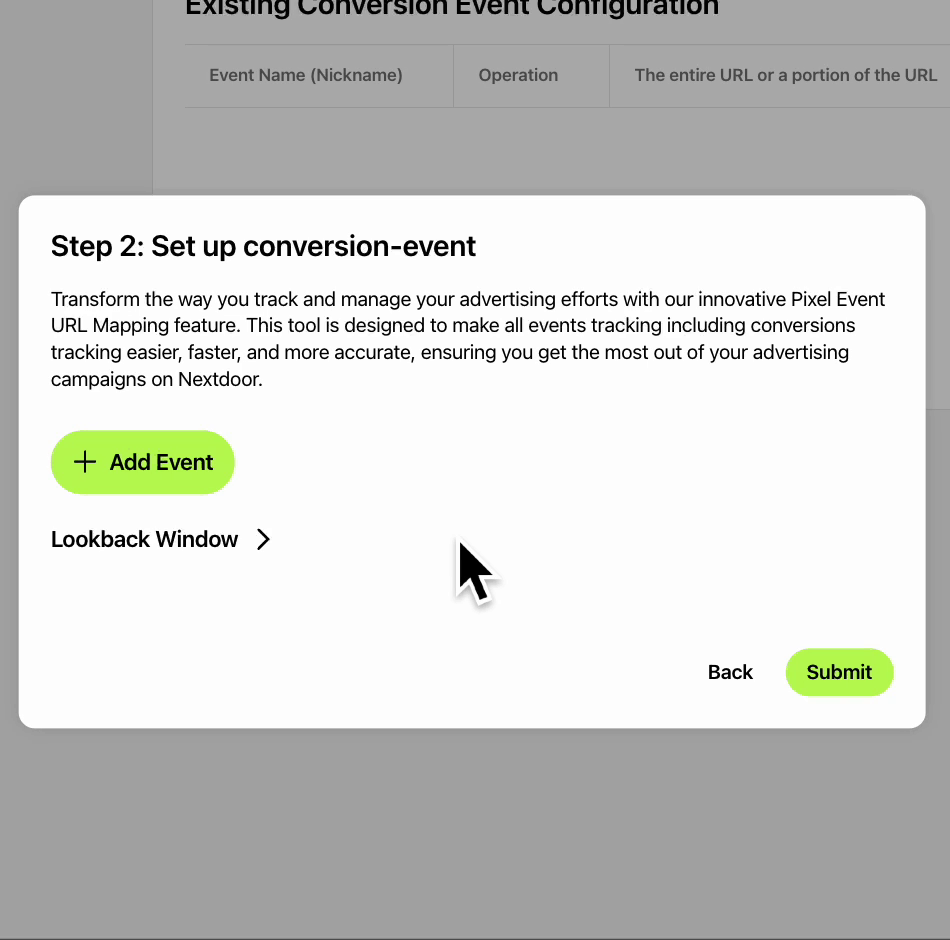
- In “Step 2: Set up conversion-event”, make sure to configure ALL of YOUR desired conversion events and their associated URL tracking logic.
-
- CRITICAL STEP: Replace the entire existing/legacy base pixel code in your website’s code, with this new universal pixel base code that you copied.
- Visit Nextdoor Ads Manager (NAM) > Assets > Pixels > Install Code, to view pixel installation steps.
- Locate your existing Nextdoor base pixel code.
-
The Nextdoor universal pixel is compatible with popular tag managers like:Tag Management System- Google Tag Manager
- Tealium
- Hightouch
** Note: As of May 2025, the universal pixel can be implemented in GTM, Tealium, and Hightouch using the Custom HTML Tag. Nextdoor's tag template for Tealium is scheduled for release in Q3 2025, at which point you can switch from the Custom HTML Tag to the tag template method. As of June 2025, the universal pixel compliant updated tag template is available in GTM.
Tag management systems provide significant advantages by streamlining development, speeding up implementation, centralizing tracking, and simplifying pixel troubleshooting. They also improve tracking accuracy through precise control over pixel firing using triggers and variables. However, effective use requires proficiency in the tag management system.
-
-
For advertisers who implemented the Nextdoor pixel via Google Tag Manager (GTM). There are two common implementation methods when using GTM: custom HTML code (copy & pasted the pixel) OR Nextdoor Tag Template. Determine which of these two methods you used to place the pixel and follow the respective instructions below.Google Tag Manager-
Custom HTML Code (copy & pasted the pixel)
- Locate your existing Nextdoor base pixel tag in GTM.
- Go to your Google Tag Manager workspace.
- Click on "Tags" in the left-hand menu.
- Find the tag that contains your Nextdoor base pixel code. It might have a name like "Nextdoor Base Pixel" or something similar.
- Click on the tag to open its settings.
- Update the base code.
- Replace the entire existing base pixel code with the new universal pixel base code. You can find the latest base code in the Nextdoor Ads Manager via Assets > Pixels.
- You may ignore / skip Step 2 “Set Up Conversion-Event” in your NAM portal, as this conversion event-type logic will be handled by and within GTM.
- Locate your existing Nextdoor conversion pixel tag(s).
- Go back to GTM to the "Tags" page.
- Find the tag(s) that are currently tracking conversion events. They might have names like "Nextdoor Conversion - Lead" or "Nextdoor Conversion - Purchase."
- Click on one of these conversion tags to open its settings.
- Identify the "CONVERSION" event.
- Look for the part of the tag configuration where the event type is specified. It will likely be set to "
Conversion".
- Look for the part of the tag configuration where the event type is specified. It will likely be set to "
- Change "CONVERSION" to a different, supported event.
- Refer to the list of pre-defined acceptable conversion events in Nextdoor
- Choose the event that best corresponds to the action you want to track (e.g., "Lead", "Purchase", "Sign Up").
- Replace "Conversion" with the name of the new event.
- Repeat steps 3-5 for all your Nextdoor conversion pixel tags.
- Save your changes to each tag.
- Preview your changes.
- Click the "Preview" button in the top right corner of your GTM workspace.
- Navigate to your website and perform actions that should trigger your Nextdoor pixel events.
- Check the GTM Preview pane at the bottom of your screen to ensure your base pixel is firing and your conversion events are firing with the new event names.
- Publish your changes.
- Once you've confirmed everything is working correctly, click the "Submit" button in the top right corner of your GTM workspace.
- Add a descriptive name to your version and click "Publish."
*Minimum Implementation: Note, if updating all conversion tags is too much work, the bare minimum requirement is to place the updated base pixel on the landing page and update the conversion event on the conversion page to a supported event (or keep PAGE_VIEW and map it to other events within the Nextdoor Ads Manager UI). For each conversion tag, you must change the "Conversion" event to a supported event however in order for tracking to work properly.
- Locate your existing Nextdoor base pixel tag in GTM.
-
Nextdoor Tag Template (from GTM Template Gallery)
-
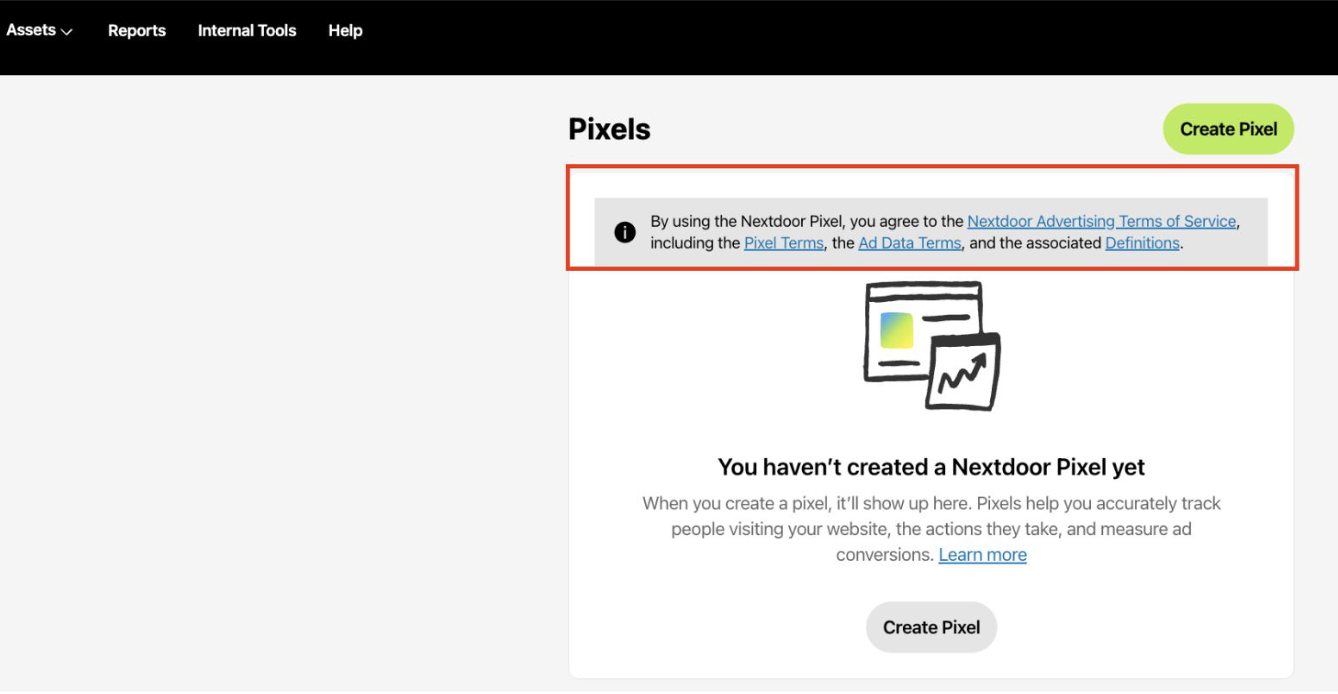
Accepting new pixel terms:
-
Managed Advertisers:
- Your Account Manager will email you the updated pixel terms: “By using the Nextdoor Pixel, you agree to the Nextdoor Advertising Terms of Service, including the Pixel Terms, the Ad Data Terms, and the associated Definitions.”
- Reply to the email with acknowledgement to accept the new terms.
- After accepting the new pixel terms, you can follow the instructions on the next steps.
-
Self-Serve Advertisers:
- In the NAM UI, Go to Assets > Pixels. You can also click the link here.
- Read through the new pixel terms at the top of page.
- After reading the new pixel terms, you can follow the instructions on the next steps.
-
-
Update to Nextdoor Universal Pixel Template
- Go to your Google Tag Manager workspace.
- Click on "Templates" in the left-hand menu.
- In the "Tag Templates" section, click the clock icon to update the "Nextdoor Pixel" template (see example below).
- Click “Accept Update” to apply the latest template to existing Nextdoor tags.
- Please reference this link for updated pixel terms.
-
Locate your existing Nextdoor conversion event tag(s) in GTM.
- Go to your Google Tag Manager workspace.
- Click on "Tags" in the left-hand menu.
- Find the tag(s) that are using the "Nextdoor Pixel" tag template and are currently tracking conversion events. They might have names like "Nextdoor Event - Lead" or "Nextdoor Event - Purchase."
- Click on one of these conversion tags to open its settings.
-
Identify the "Event Name" field.
- Within the tag configuration, look for a field labeled "Event Name". It will likely be set to "Conversion" or "Page View" as the standard event by default, which tracks regular page visits. If you wish to track a specific conversion event (such as "Lead" or "Purchase"), follow the steps below to update the "Event Name" to reflect that conversion. Otherwise, leave it as "Page View" to capture all page visits.
-
Change "CONVERSION" to a different, supported event. (As of June 2025, with the introduction of the universal pixel framework,
conversionis no longer a supported event type/name.)- Refer to the list of pre-defined acceptable conversion events in Nextdoor
- Choose the event that best corresponds to the action you want to track (e.g., "Lead", "Purchase", "Sign Up").
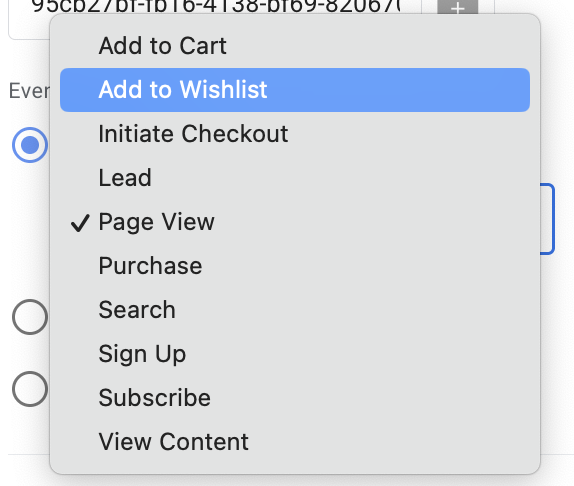
- Replace "
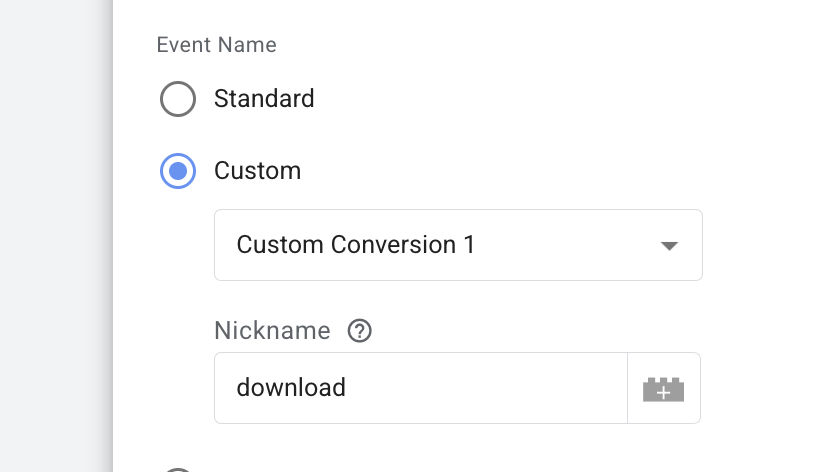
Conversion" with the name of the new event in the "Event Name" field. - If you are using any custom conversions, you can now indicate human-friendly nicknames to them. Feel free to enter a short and relevant nickname to your custom conversions. For example, something like
downloadorquote.
-
Repeat steps 1-3 for all your Nextdoor conversion event tags using the template.
-
Save your changes to each tag.
-
Preview your changes.
- Click the "Preview" button in the top right corner of your GTM workspace.
- Navigate to your website and perform actions that should trigger your Nextdoor pixel events.
- Check the GTM Preview pane at the bottom of your screen to ensure your conversion events are firing with the new event names.
-
Publish your changes.
- Once you've confirmed everything is working correctly, click the "Submit" button in the top right corner of your GTM workspace.
- Add a descriptive name to your version and click "Publish."
-
-
-
Important Note: As of May 2025, the Nextdoor tag template in Tealium is being updated to align with the new Universal Pixel framework. This update, which will be live soon, includes renaming "conversion" events to match new event naming conventions for more accurate and standardized tracking. If you use Tealium and wish to upgrade to the Universal Pixel, please contact your Account Manager to involve Nextdoor Solutions Engineers for migration assistance. Further updates and documentation will be provided upon the new template's release.Tealium
-
Partial Migration
tl;dr: No changes to your current pixel in your website's code; just remapping legacy events to those supported by the Universal Pixel
Advertisers who cannot or will not immediately update their base pixel (aka must continue using the legacy base code), can continue tracking conversions that adhere to the new universal pixel events framework; provided they map their current events to the new universal pixel event standards.
Any legacy events need to be migrated to new universal pixel event names to align with the updated structure. This ensures future compatibility. If this applies to you, please update your pixel event names to match the new framework detailed in the chart below.
| Legacy Events | Universal Pixel Events | Action to be taken |
|---|---|---|
| Conversion | N/A | Conversion events will need to be migrated to one of the new event names |
| Purchase | Purchase | |
| Lead | Lead | |
| Sign Up | Sign Up | |
| N/A | Add to Cart | |
| N/A | Initiate Checkout | |
| N/A | Page View | |
| N/A | Search | |
| N/A | View Content | |
| N/A | Add to Wishlist | |
| N/A | Subscribe | |
| Custom Conversion 1-10 | Custom Conversion 1-10 + nickname |
|
Advertisers who choose not to adopt the new universal pixel base code can opt for a "partial migration." This involves retaining their existing legacy code on their site while using Nextdoor's Ads Manager (NAM) UI to map PAGE_VIEW events to other supported events. Essentially, the universal pixel will track page views by default, and advertisers can then use the NAM UI to reconfigure these page view events to represent various standardized conversion events.
Universal Pixel compliancy via Partial Migration
To re-map non-supported legacy events to compliant universal pixel events within the NAM UI, advertisers would generally follow a process that involves:
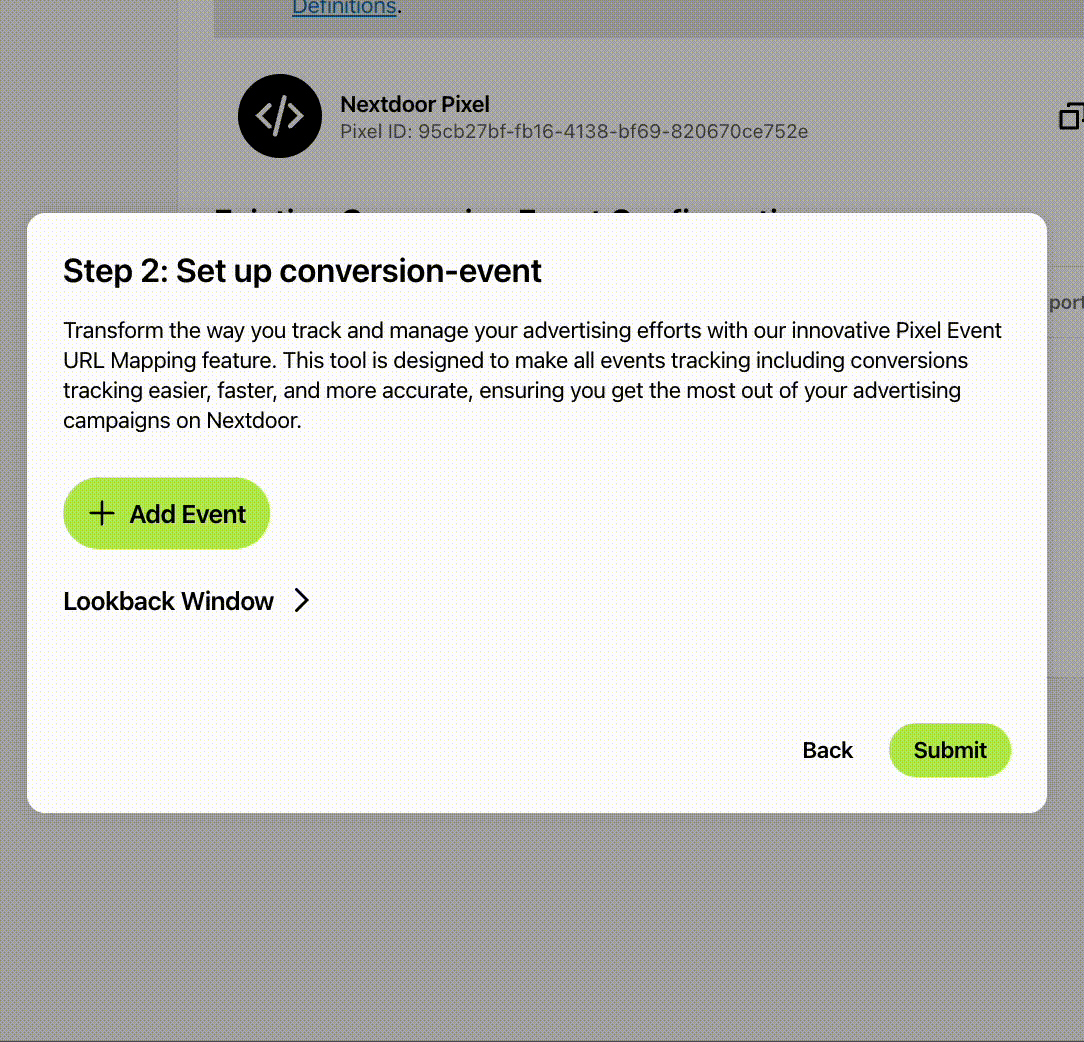
- Generating the Universal Pixel:
- Existing advertisers are prompted to use the universal pixel flow, , via Assets > Pixels > Install Code
-
- Existing advertisers are prompted to use the universal pixel flow, , via Assets > Pixels > Install Code
- Reconfiguring Event Names:
- Advertisers may need to adjust their current events to be compliant with the new pixel structure.
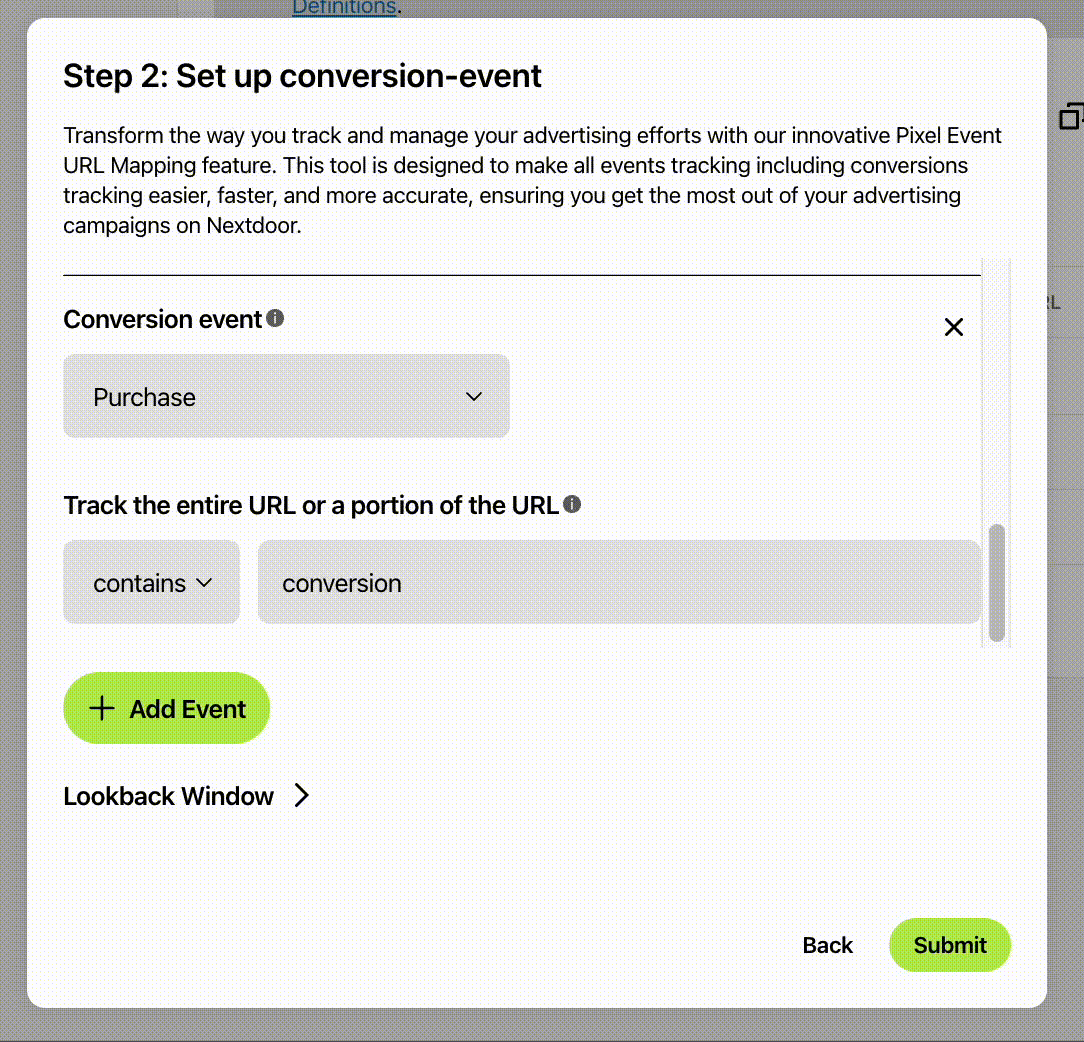
- Skip/Proceed to Step 2 in the flow; legacy events like "Conversion" need to be migrated to one of the new event names - standardized events include "Purchase," "Lead," "Sign Up," "Add to Cart," etc..
- In the NAM UI, advertisers can select pre-set standardized conversion event name options to map to specific URLs on their website.
- They can specify the conditions of the event that’s mapped to a URL.
-
- Using the Event Manager:
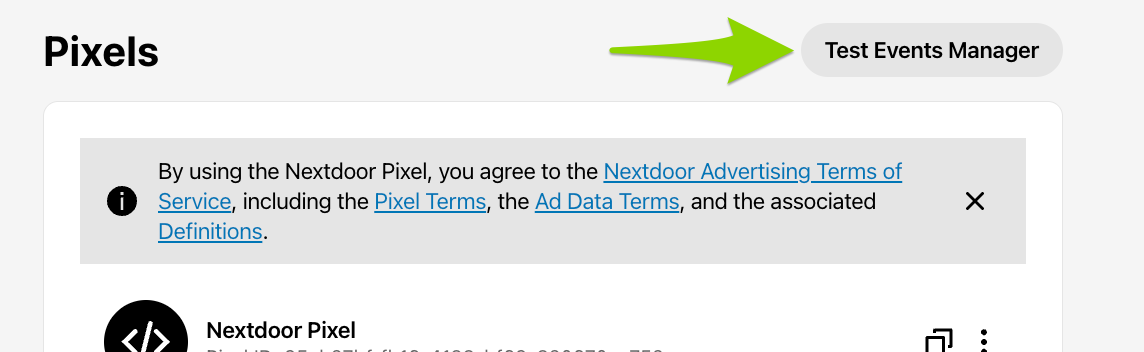
- The new pixel will enable use of NAM's Test Events Manager, where teams will have a UI-based pixel configuration flow and diagnostic tool (Note: this is only supported in Chrome browser)
- This includes the ability to set up multiple conversion events, and one conversion event mapped to one URL.
-
- Auditing and Updating Custom Events:
- If you have custom conversion events (1-10), these need to be audited to see if a new standard event is a better match.
- If not, you need to have a ‘nickname’ added for improved categorization.
-
The universal pixel simplifies event tracking by using a single code deployed once. Event-specific tracking and configuration are then managed within the NAM UI, eliminating the need for multiple unique pixel codes. Therefore, it is essential to routinely review and update your conversion tracking logic (i.e., the "equals" or "contains" conditions that trigger specific conversions).
Important Note: The precise steps for remapping events will vary based on your specific configuration and tools. While your development team can typically handle this implementation, contact your Account Manager for assistance or if you have any questions.