Purpose: Guide advertisers setting up a Nextdoor pixel for the first time.
Pixel Implementation For Net-New Advertisers
Who is this guide for?
This applies to advertisers who are net-new to Nextdoor as of May 2025; creating and implementing a pixel for the first time.
How to create and implement the universal pixel
An advertiser can implement the universal pixel & new event types standards, by installing the new base code snippet on their website(s) - either by directly / manually installing it OR installing it in a tag management system (e.g. Google Tag Manager, Tealium). This documentation provides custom guidance for both implementation method paths:
For questions, advertisers should contact their Account Manager (AM).
Nextdoor AMs should collaborate with Solutions Engineers (SolEngs) to resolve any migration issues.
Direct / manual implementation
Custom coded ; without a tag manager
- Create your pixel code in the Nextdoor Ads Manager (NAM)
- Log in to your Nextdoor Ads Manager (NAM); go to Assets > Pixels
-
- Click “Create Pixel”
-
- Log in to your Nextdoor Ads Manager (NAM); go to Assets > Pixels
- Grab the pixel code snippet
- Click on the three (3) dots to the right of the pixel ID, and click on “Install code”
-
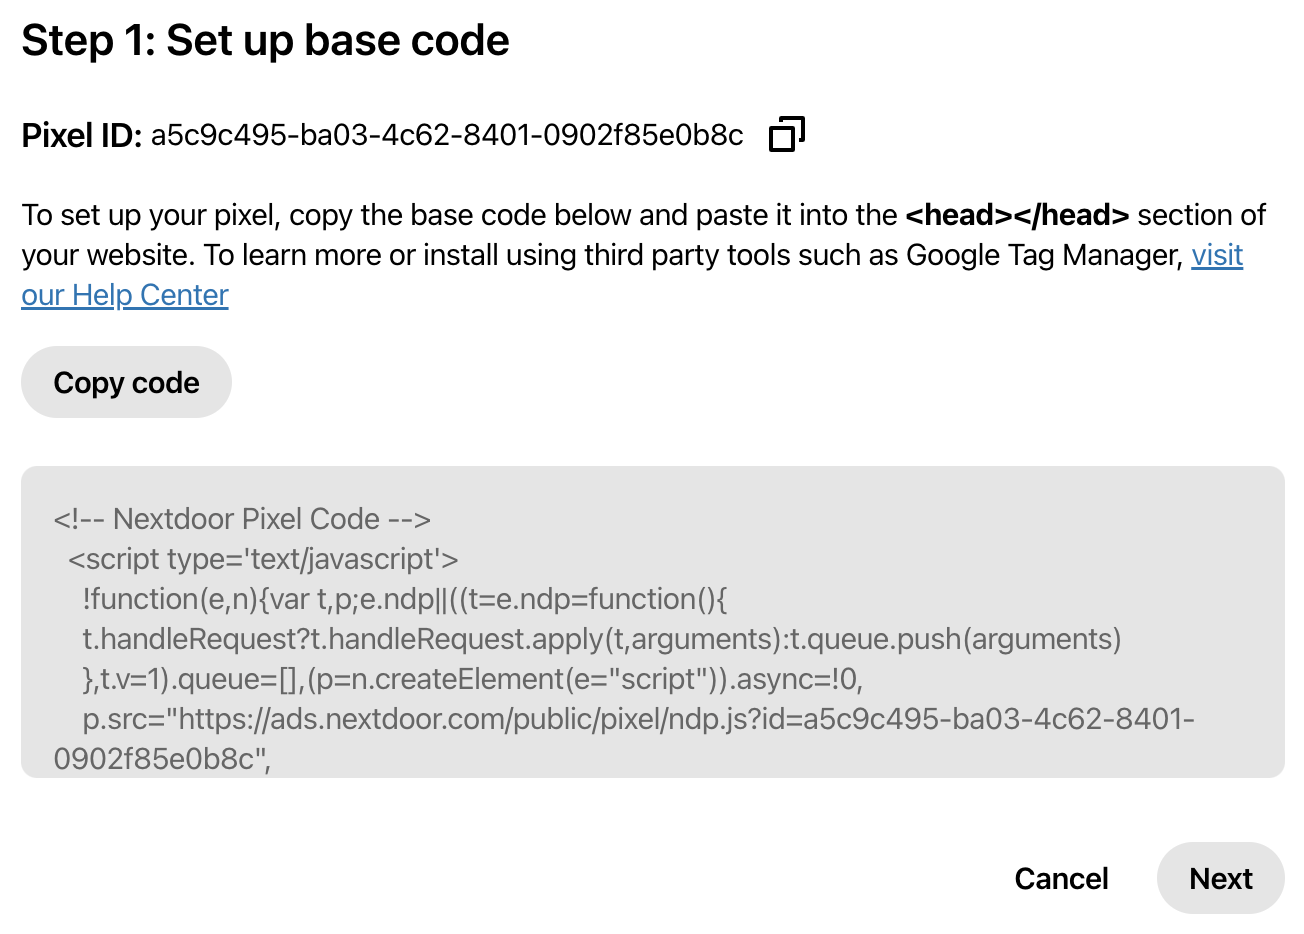
- In “Step 1: Set up base code”, copy the code snippet and paste it somewhere safe like a text editor (we’ll install it on your website in a few steps) . Click “Next” to go to Step 2, where you’ll set up your conversion events and their respective tracking/firing logic.
-
- In “Step 2: Set up conversion-event”, make sure to configure ALL of YOUR desired conversion events and their associated URL tracking logic.
-
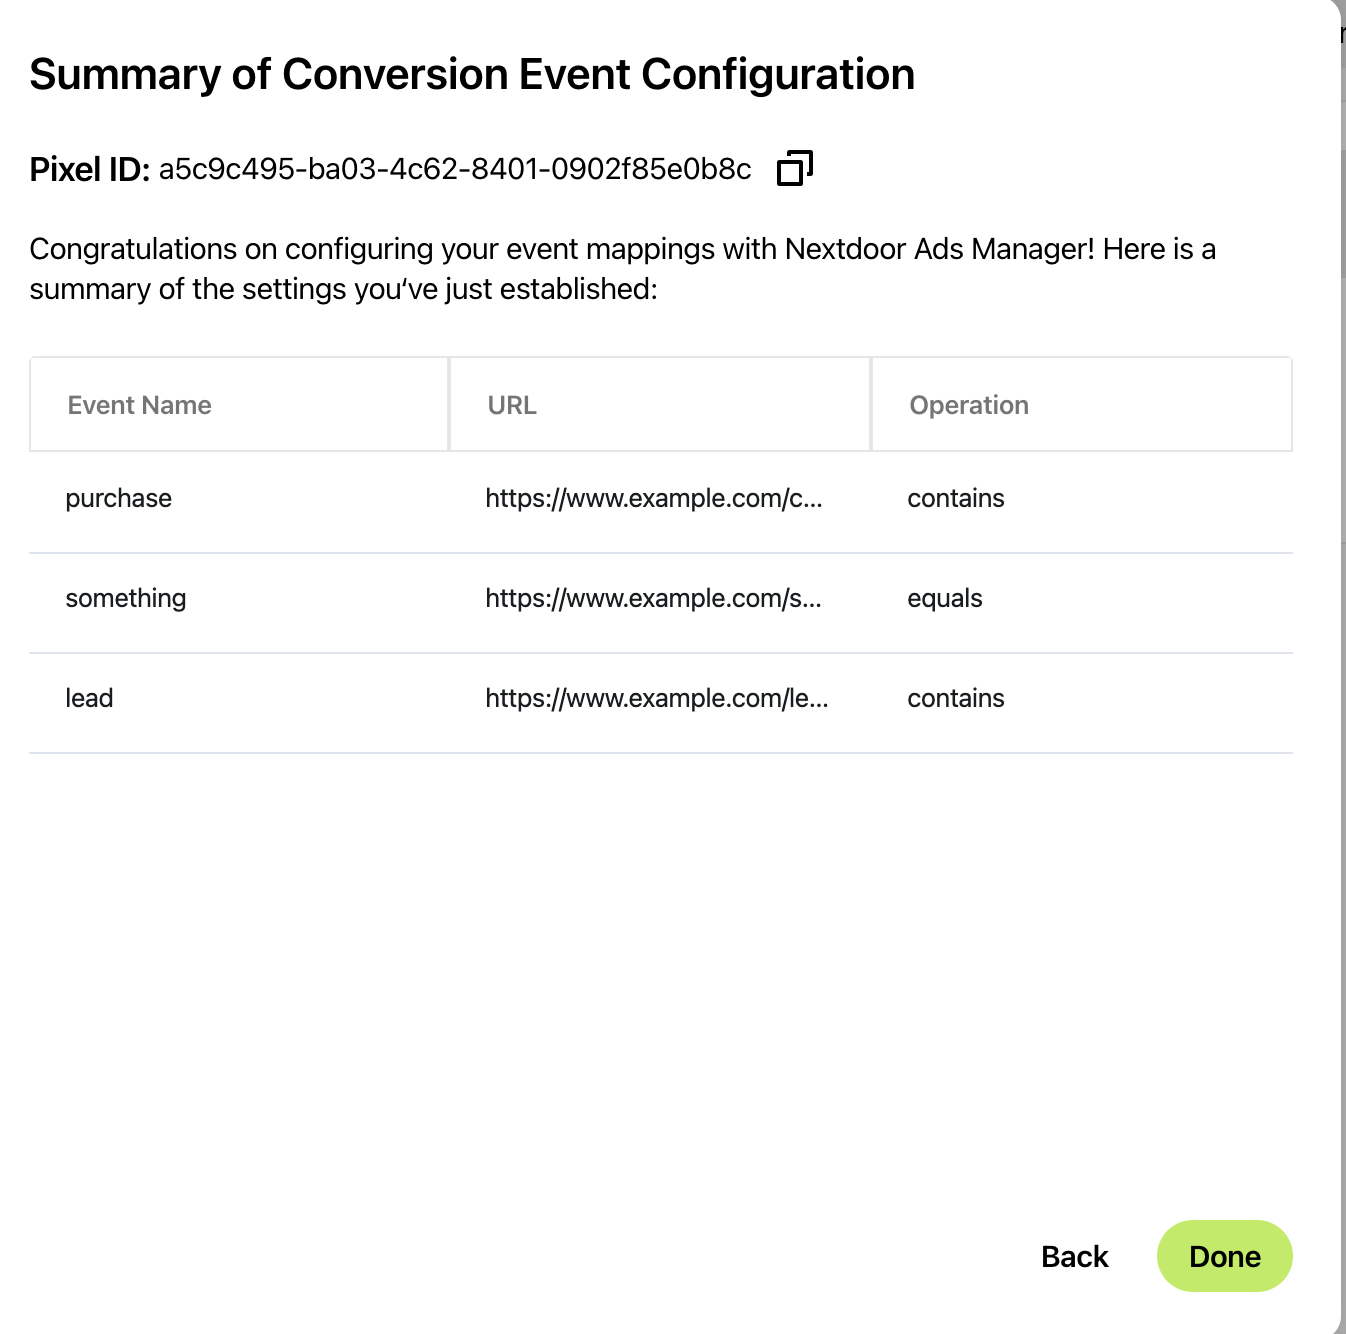
- Click on “Submit”’; you should see a “Summary of Conversion Event Configuration”. Make sure the logic in the table looks correct for each conversion event.
-
- Click on the three (3) dots to the right of the pixel ID, and click on “Install code”
- Installing your pixel code
- Install the Nextdoor base pixel code you just copied from a prior step, within your website's HTML. This is typically in the \<head> section of your site's pages. We strongly recommend placement in the <head> to ensure proper tracking and pixel firing.
- Note: You'll need to ensure it's placed on all pages you want to track; especially those where the conversion events happen.
- Save your changes to each page where you updated the pixel code.
- Test your changes.
- Navigate to your website and perform actions that should trigger your Nextdoor pixel events.
- Use your browser's developer tools (usually accessed by pressing F12) to inspect network requests and ensure your base pixel is firing and your conversion events are firing with the new event names.
- Confirm proper pixel setup and data flows with your Nextdoor team.
Tag Management System Implementation
The Nextdoor universal pixel is compatible with popular tag managers like:
- Google Tag Manager
- Tealium (To be updated Q2'25)
Tag management systems provide significant advantages by streamlining development, speeding up implementation, centralizing tracking, and simplifying pixel troubleshooting. They also improve tracking accuracy through precise control over pixel firing using triggers and variables. However, effective use requires proficiency in the tag management system.
Google Tag Manager (GTM) Implementation
- Obtain your Nextdoor Pixel Code:
- Log in to your Nextdoor Ads Manager account.
- Navigate to the "Pixel" section (under “Assets”).
- Create your unique Nextdoor Universal Pixel code by clicking on “Create Pixel”. This will be a code snippet that needs to be installed on your website. Copy this code and keep it hand
- Add the Nextdoor Pixel Template to Google Tag Manager:
- Go to your Google Tag Manager workspace.
- Click on "Templates" in the left-hand menu.
- In the "Tag Templates" section, click "Search Gallery."
- Search for "Nextdoor Pixel" and add the template to your workspace.
- Create a New Tag in GTM:
- Click on "Tags" in the left-hand menu.
- Click "New" to create a new tag.
- Give your tag a descriptive name, like "Nextdoor Universal Pixel - All Pages".
- Configure the Tag:
- Click on "Tag Configuration."
- Choose the "Nextdoor Pixel" template you added earlier.
- Paste your Nextdoor Pixel code (obtained in step 1) into the appropriate field in the template.
- Set a Trigger:
- Click on "Triggering."
- Choose a trigger that determines when the pixel should fire. For most new installations, you'll want the pixel to fire on all pages. Select the "All Pages" trigger.
- Save the Tag:
- Click "Save" to save your tag configuration.
- Preview your Changes:
- Click the "Preview" button in the top right corner of your GTM workspace.
- Navigate to your website.
- Check the GTM Preview pane at the bottom of your screen to ensure the "Nextdoor Universal Pixel - All Pages" tag is firing correctly.
- Publish your Changes:
- Once you've confirmed everything is working, click the "Submit" button in the top right corner of your GTM workspace.
- Add a descriptive name to your version (e.g., "Added Nextdoor Universal Pixel") and click "Publish."
- Defining your conversion events in NAM; for all URL-based events (e.g. "purchase" fires on Thank You page)
-
- In “Step 2: Set up conversion-event”, make sure to configure ALL of YOUR desired conversion events and their associated URL tracking logic.
-
- Click on “Submit”’; you should see a “Summary of Conversion Event Configuration”. Make sure the logic in the table looks correct for each conversion event.
- In “Step 2: Set up conversion-event”, make sure to configure ALL of YOUR desired conversion events and their associated URL tracking logic.